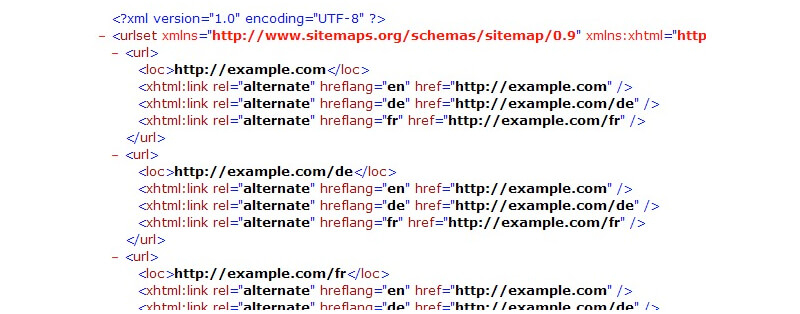
What is an XML Sitemap?
An XML sitemap is a way for website owners to inform Search Engines about specific page (or images or products) on their website. A WordPress XML sitemap also informs Google which links on your website are more important than others and how frequently you update your website. Otherwise, you are possibly waiting for Google to crawl your website when it gets round to it. At least with an XML sitemap, you can give Google the 'heads-up' on your content.
An XML Sitemap is information coded in a specific way and presented in an XML file format. This data tells Search Engines about your content in a set range of specific parameters. It lists the URL's (the web address of your page), when they were last updated and how important they are about the other URL's on your website.
An XML sitemap can be coded by hand or created with one of the many XML sitemap generators. (We use Screaming Frog Pro). XML sitemaps need to be up-to-date when new content is added to your website. As you can see that could become a time-consuming process.
Luckily when you have a website created on the WordPress platform, you can automate XML sitemap creation.

Why do I need an XML Sitemap?
You only really need an XML sitemap if you are doing SEO and needing to drive the maximum traffic to your website. If this isn't you, then you probably don't need one.
While sitemaps do not boost your search rankings, it allows search engines to better crawl your website. Potentially improving how Google understands your website structure and the importance of certain content.
If you are serious about maximising search rankings then you need to set up and integrate Google Search Console and your XML sitemap(s).
Also, if your website is on the WordPress.com platform, you have different options - read here. This article is about a self-hosted WordPress website.
So what's the easy way to add an XML sitemap with WordPress?
As always there is a multitude of ways to include an XML sitemap with WordPress. I'm just going to cover one way here, to get you started.
Firstly head over to Google Search Console and get your website connected.
To set up a Google Search Console account either login as you would for your Google Analytics or login to a Google account.
Then head over to your plugin area on your self-self hosted WordPress website. If you don't already have it installed, install Yoast.
If you are serious about a traffic driving SEO strategy then you probably already have this installed.
Setting up your XML sitemap
- On the Yoast admin area look for the General area, make sure XML sitemaps is turned on.
- Then click on the ? icon next to the name XML sitemaps, this will reveal your XML sitemap. You need this to be able to submit it to your Search Console admin area.
- Now head back over to your Google Search Console
- Look for Crawl >> sitemap
- Top right, look for the red button "Add/Test sitemap" this asks you to input the URL where your sitemap lives. Typically with WordPress this looks something like – yourdomain.com/page-sitemap.xml
- Put this in the Add/Test sitemap box and click submit.
- Refresh your Search Console and you should see that the new sitemap is 'pending'.
- Leave this for a short while and check back later, this should be processed or flag any errors.
- You are all done.
The Takeaway
With SEO every aspect matters, adding an XML sitemap is an important part. Once you have it set up you shouldn't need to work on it again, unless there is any new Post Type content added to your website that you want Google to crawl.
If you need any help with your WordPress XML sitemap, get in touch for WordPress Training and we can set up a training session.
FREE Guide. How to get started with your WordPress Website.
Your FREE PDF guide to get you up and running with your *WordPress website - fast!

*For self-hosted WordPress websites.

